
Basic ASP.net Core Razor App in Docker: From Inception to Production
I’m becoming a fan of Docker. In fact, every new web application I build will be deployed in a docker container. For so many reasons - such as consistency, portability, and resource efficiency (you can read about all those reasons on the internet).
However, in terms of documentation about getting started with .net applications on docker I found a gap. Microsoft documentation is specific to Microsoft tools/pipeline. And I’m not married to Visual Studio or VSTS. I don’t want to push a button in Visual Studio and have my container magically show up on an Azure VM - at least not yet. I want to learn the details and manual steps to deploy a container to my own linux server. I want to be able to choose where I host my applications. And I need to know what is happening under the hood.
My intention with this article is to take you from nothing to asp.net core application in a basic production docker container. There are a number of steps:
- Build an asp.net application in your development environment
- Add support for docker
- Build and publish a docker image
- Write a docker compose file
- Download and run your docker image in a container on your production linux server
You’re going to see this in the most straightforward fashion possible. Many topics (even some best practices) have been left out for the sake of simplicity. You can read about them in future articles. For example, automated builds of docker images from commits to a git repository and remote management of swarms of docker containers with docker machine.
Before we get started, there are a couple of prerequisites that you need installed on your computer.
- text editor
- .net core sdk
- Docker for Windows
- An account on Docker Hub
- Empty linux server sitting around that you can play on
Yes, I said Docker for Windows! (this from a .net linux guy). This post is showing how to build an application targeting a linux host from a Windows 10 development machine. Since I’m working entirely from the command-line the steps are almost identical to do this on a linux (or mac) development environment.
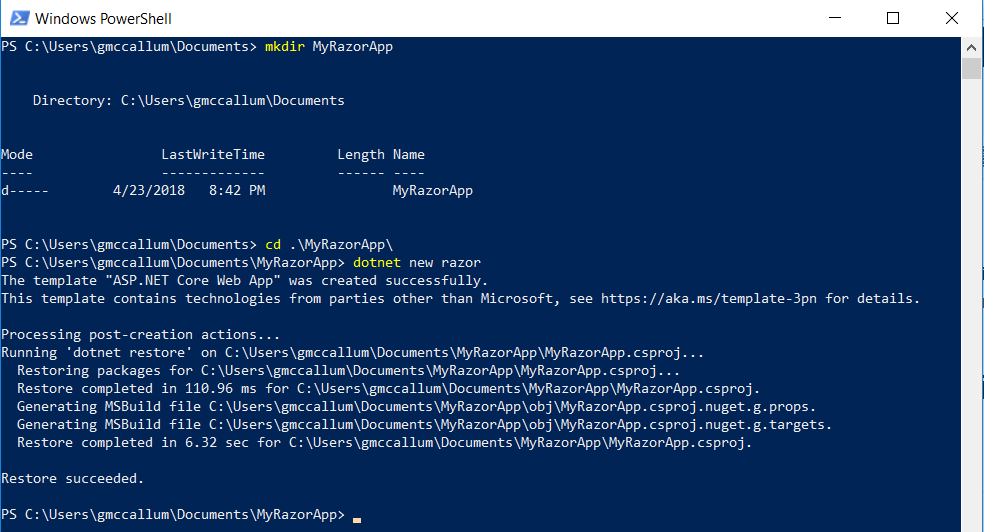
1. Create an ASP.net core web application
First thing, scaffold out a new application (you should be familiar with this).
>mkdir MyRazorApp
>cd MyRazorApp
>dotnet new razor
Output:
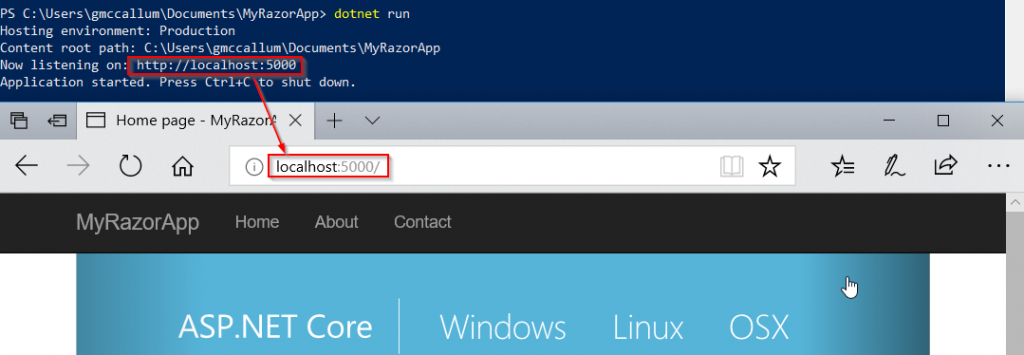
You can run it same as any dotnet core application. And open it in the browser (note the default port: 5000)
2. Add docker support to your project
Still in the MyRazorApp directory you can open the project in the text editor of your choice. I’m using VS Code (cause it supports dockerfile syntax). Launch it directly from powershell using this command.
>code .
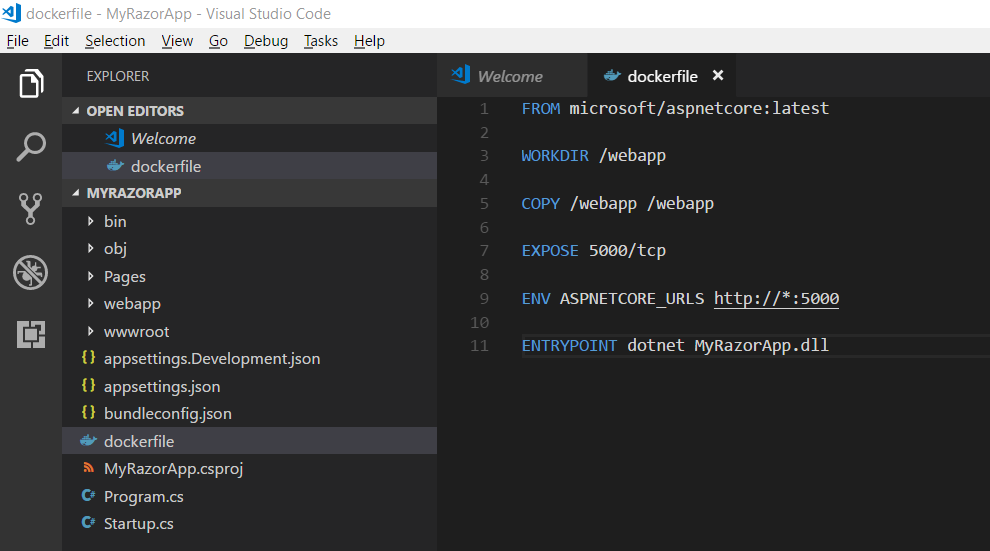
In the root of that project directory create a new file named dockerfile. Populate it with the following and then save.
FROM microsoft/aspnetcore:latest

WORKDIR /webapp

COPY /webapp /webapp

EXPOSE 5000/tcp

ENV ASPNETCORE\_URLS http://\*:5000

ENTRYPOINT dotnet MyRazorApp.dll
In VS Code it looks like this (nice syntax highlighting!):
Publish a release version of your dotnet project (since you plan to publish the docker image later for production use). Build a new Docker image. Then at this point you can launch your application inside of a docker container on your development machine directly from the local command-line in powershell.
\>dotnet publish -c release -o webapp
>docker build -t myrazorapp .
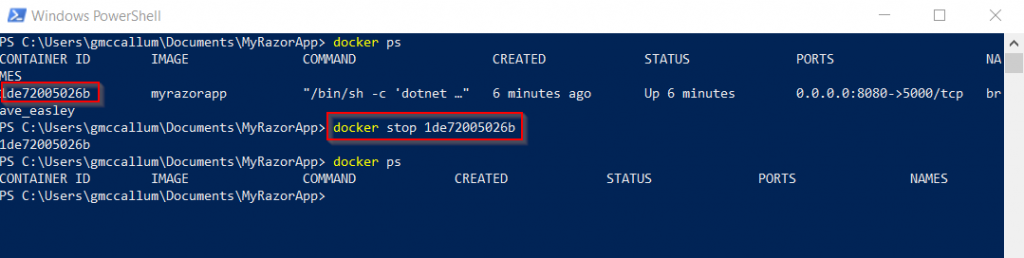
>docker run -d -p 8080:5000
>docker ps
Output (note the redirected port: 8080).
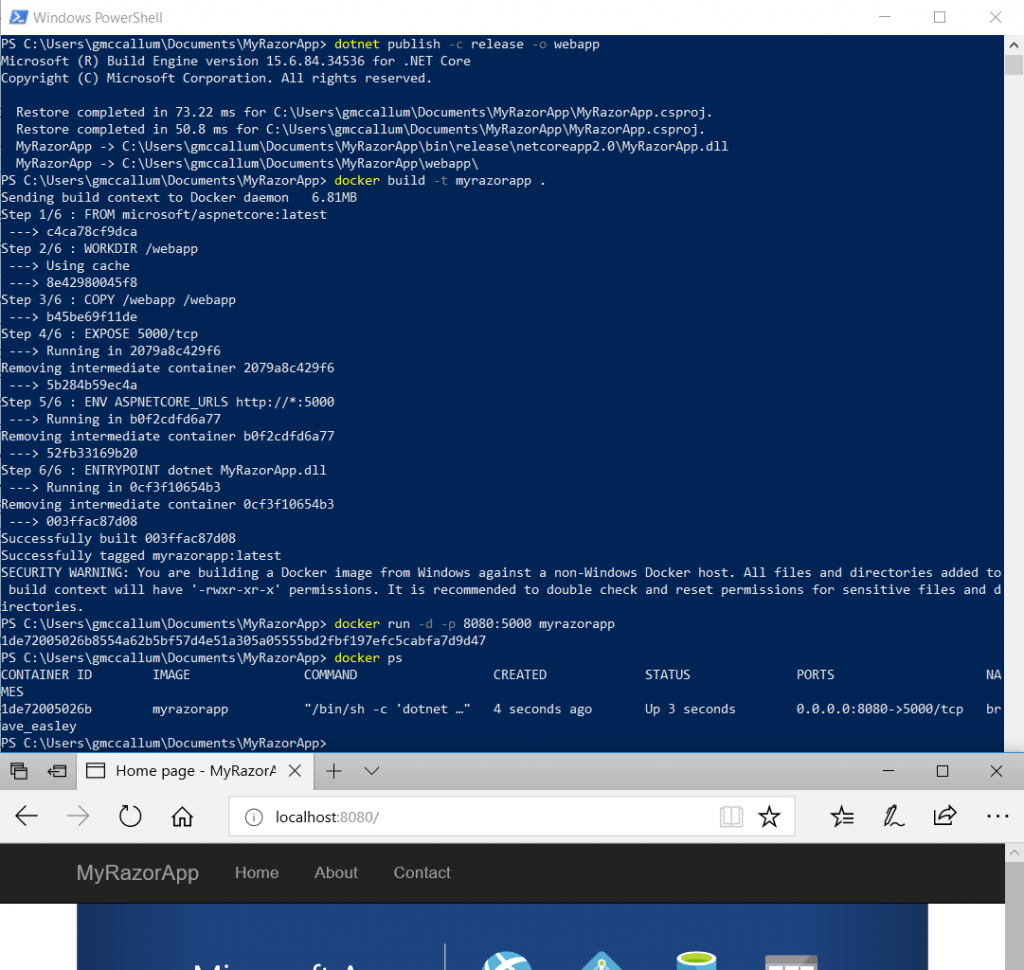
Obviously, since it is running on my development machine it is not yet a production deployment. However, now it is running in linux. When we ran it previously using dotnet run it was running in Windows. You don’t want this image running forever on your dev machine so these are the commands to tear it down.
>docker stop <containerid>
>docker ps -all
>docker rm <containerid> #if you want to remove the container after it is stopped
>docker ps -all
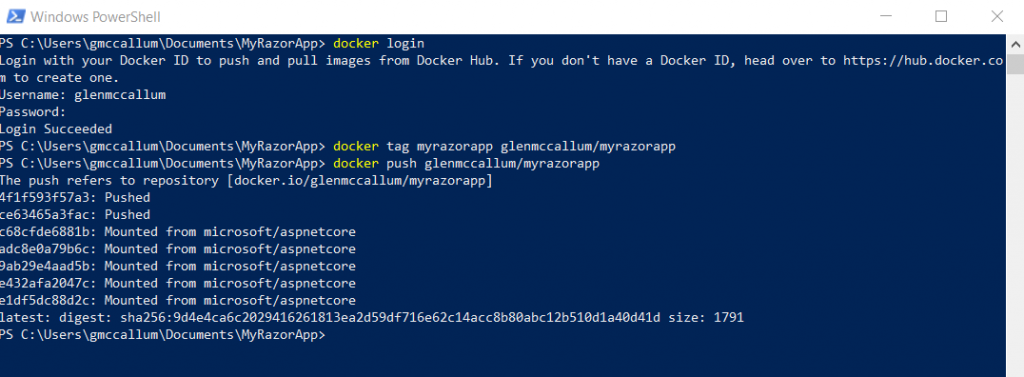
3. Publish your Docker image to a repository
You can put your MyRazorApp docker image in a public or private repository - on docker hub or outside of docker hub private hosted even (a topic for another post). In addition it is customary to tag your images before publishing.
>docker login
>docker tag myrazorapp glenmccallum/myrazorapp
>docker push glenmccallum/myrazorapp
>docker logout
Output:
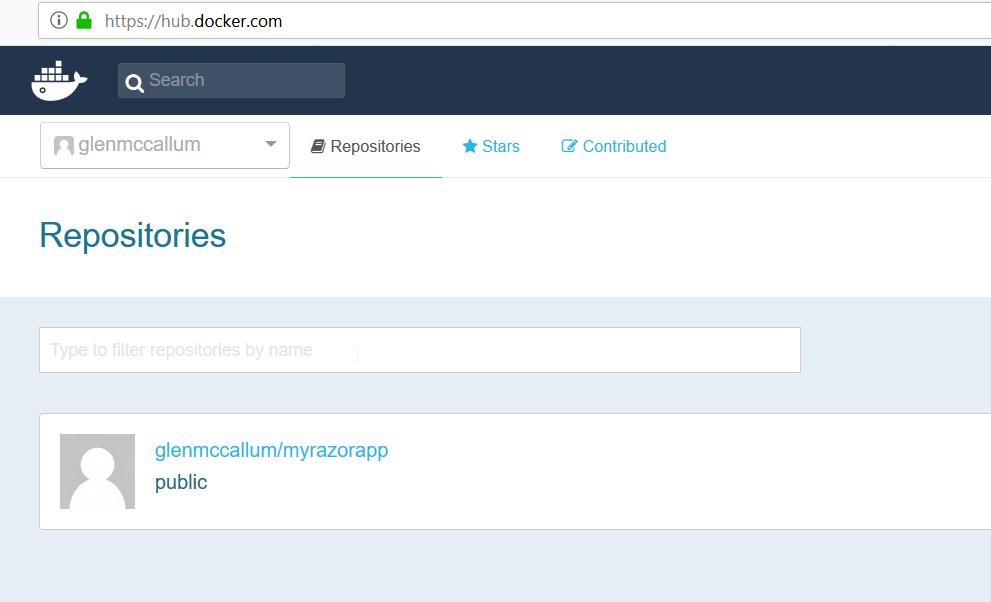
And the MyRazorApp docker image appears in your Docker Hub dashboard!
4. Create a Docker Compose file
For a basic example like MyRazorApp this is step optional. You can deploy manually. But for a more complex system a docker compose file may come into play earlier in the development cycle. Say if you’re deploying a separate docker container as a database server in addition to the web server.
The one time I’ve been involved with purchasing software deployed in a docker container the company sent us a docker compose file and granted us access to their private docker hub repository. That was how it was distributed. So you distribute only your docker compose file. Then a system administrator deploying your application (in the form of a docker image) can pull it directly from a public or private repository.
Docker compose has evolved. As container technologies have matured, the scope of the docker compose file has increased in subsequent versions (version 1, version 2, and version 3 as of this writing). It is now a tool for orchestrating multi-container distributed applications. It has networking and load-balancing capabilities and operates on a swarm (group of docker machines). In this section we’ll use the most basic version and only define one docker container within it - just enough to dip our toe in the water.
It does not get much more basic that this docker-compose.yml file:
web:
 image: glenmccallum/myrazorapp:latest
 ports:
 - "80:5000"
 restart: always
5. Download and run your docker image as a container on your production linux server
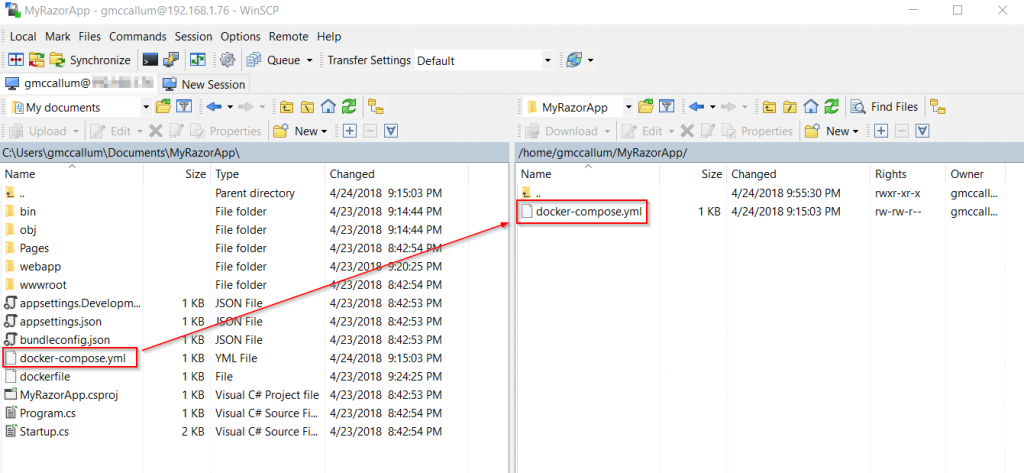
For simplicity I’m using Ubuntu Server 16.04.4 LTS running as a virtual server in hyper-v. But it could be a linux server running anywhere. The steps are the same even if you’re connecting via ssh to a droplet at Digital Ocean.
The tools of choice are Git Bash as an ssh client and WinSCP as an sftp client.
Start an ssh session to your ubuntu server in git bash. For the next 2 steps follow the instructions at the links. This instructions are well documented already.
Install Docker Engine (now part of Docker CE). https://docs.docker.com/install/linux/docker-ce/ubuntu/#install-docker-ce-1
Install Docker Compose. https://docs.docker.com/compose/install/
Then create a new directory in your home folder.
> mkdir MyRazorApp
Copy over the docker compose file using WinSCP.
Back over to the ssh session in git bash:
>cd MyRazorApp
>sudo docker-compose up -d
Output:
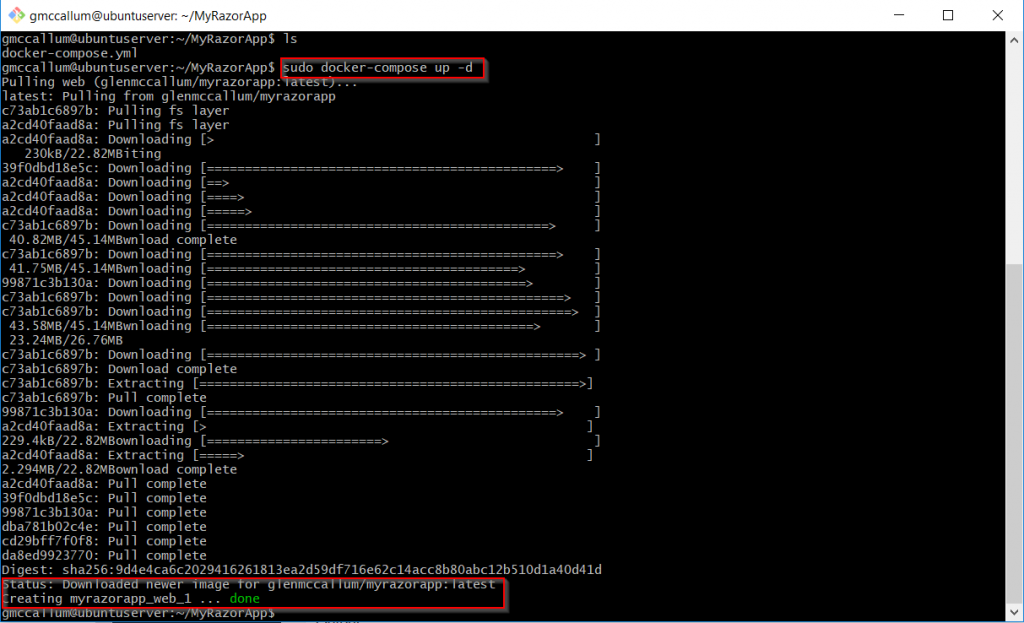
And if it works you should see the application running on your linux server on port 80.
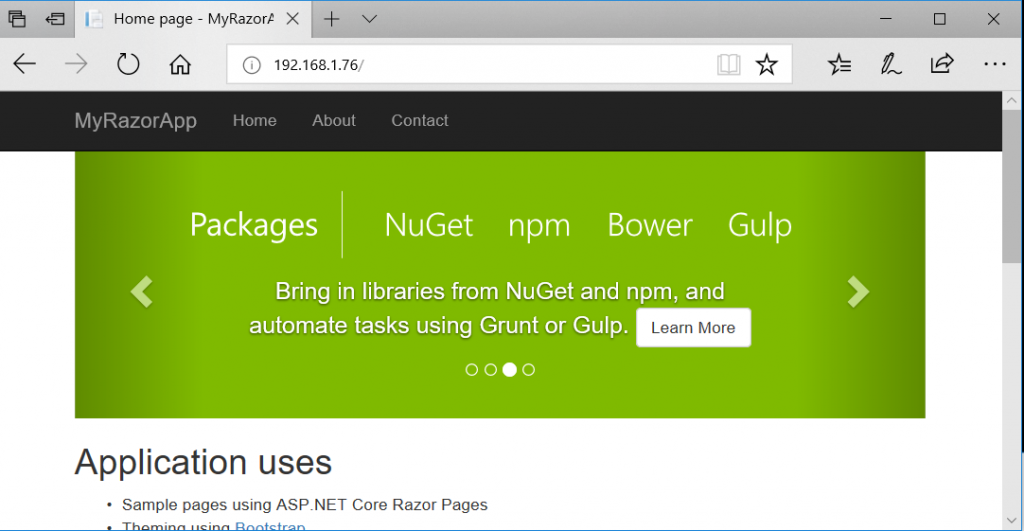
It worked! This one post has so many areas we can investigate deeper. Let me know in the comments what you would like to learn more about.
